Encounter Battle in Spain
“The year is 1811. A French force and a British force are on a collision course towards the village of Pueblo Cajones
Brett, Chris and myself played a “what if scenario” for our second game (Chris’s first) in the same manner as our first, relatively open and transparent, as we are still learning the rules (and making glaring tactical errors). As there were three of us, Brett was happy to assist Chris while effectively umpiring and rules checking, while Chris and I took main control of the British and French respectively.
Brett put this nice little scenario together, with a straightforward objective (the Village of Pueblo Cajones
British Picket consists of: ADC (Poor), 14 Elite 95th Rifles (in the village), a Hussar Squadron and 2 6pdrs from Royal Horse Artillery
French consists of: ADC, 24 Veteran Voltigeurs, a Hussar Squadron and a 6pdr Horse Artillery

The main forces were taken from the Battle
The French Forces
CiC: Marshal Victor
1st Brigade: Ruffin
9th Legere (30 Figs, Veteran), 24th Line (2 x 24 Figs, Line), 96th Line (2 x 30 Figs, 2nd Line)
2nd Brigade: Leval
45th Line (30 Figs, Line), 8th Line (2 x 30 Figs, Line), 54th Line (2 x 30 Figs, 2nd Line)
3rd Brigade: BG (Poor), Provisional Grenadiers (30 figs, Veteran)
4th Brigade: Provisional Grenadiers (24 figs, Veteran)
5th Brigade: Lamotte 1st Dragoons (14 Figs, Line, inf mounts)
6th Brigade: Divisional Artillery (3 x 6pdr, Line)
The British Forces
CiC: General Graham
1st Brigade: Wheatley
28th Gloucesters (24 figs, Line), 67th Hamptonshire (30 fig, Line), 87th Prince o Wales Irish (30 fig, Line)
2nd Brigade: Dilkes
1st Foot Guards (40 figs, Guard), 2nd/3rd Foot Guards (30 figs, Guard), 95th Rifles (10 Figs, Elite)
3rd Brigade: Barnard. Light Battalion (40 figs, Veteran)
4th Brigade: Browne. Light Battalion (24 figs, Veteran)
5th Brigade: Whittingham. KGL 2nd Hussars (10 figs, Elite)
6th Brigade: Duncan, 9pdr RA Foot Battery (3 model guns, Line)
Turn 1: The battle began quietly, with both sides having no reserve rolls until turn two. The French won initiative, and the Voltigeurs advanced centrally to engage the 95th Rifles in the town, the Hussar squadron escorting them on their left while the artillery moved into position on the French right. The British Hussars advanced on their right to threaten the Voltigeurs and French Hussars, with the RHA moving rapidly to support them. The 95th waited patiently in the village.
Turn 3: The French win initiative and managed to get a brigade on, five infantry battalions in mass column forming Leval’s 2nd Brigade, who arrived centrally and were assigned orders to assault enemy forces in the village and then hold it. For the British, Gilkes arrives with the 2nd Brigade consisting of Guards and the remaining 95th Rifles, arriving on the British left. They were duly ordered to move and hold the village. The Voltigeurs advance into musket range and open up on the 95th, picking off one of England

The view from the French left: Infantry reinforcements arrive for both sides on turn 2

The view from the French left: Infantry reinforcements arrive for both sides on turn 2
Turn 4: The British gain initiative for the first time. However, Ruffin’s 1st Brigade arrives for the French, another 5 battalion strong column, on the French right with orders to engage the British guards division that had just came into view.
The British Hussar squadron (with attached poor ADC) declared a charge against the Voltigeurs. The French Hussar squadron declared a counter-charge (but couldn’t as they weren’t in charge range...I thought they charged and intercepted at half-way but that’s not the case and they weren’t in charge range to begin with) The Voltigeurs elected to stand and shoot, and picked off a charging Hussar. The British Hussars pressed home and swept through the skirmishers, taking out six and bursting through straight, ending in front of the mass column of Leval’s 2nd Brigade. The French mass their artillery and change order to engage the British 2nd Brigade


Turn 5: The British maintain initiative and get reinforcements in the form of the KGL 2nd Hussars arriving on the British left, quickly being despatched to assault and delay Ruffin’s Brigade. The French don’t get any. The remnants of the Hussar squadron try to go out in style, but fail to press home on the column, retreating in disarray. The 95th Rifles of Dilkes Brigade reach the edge of the village, ready to reinforce their comrades, with the 2nd/3rd Foot following close behind. The 2 6pdrs of the RHA limber up to advance and enfilade the French columns. However, as the Voltigeurs move around the village, three columns from Leval’s French Brigade move up and into charge range of the village, attracting sporadic fire from the 95th within.


View from French right, as the French columns approach to musketry/rifle range of Pueblo Cajones (The 2nd KGL Hussars are just off camera top right)
Turn 6: The French win initiative and get Lamotte’s 5th Dragoons from reserve, on their left, ideally placed to threaten the British Royal Horse artillery. The British get Browne’s 4th Brigade, again down on their left with order to move to the village. The French artillery change orders to engage the 2nd KGL Hussars, and Leval’s Brigade, with CinC close by, charge 3 battalions, in mass column, into the British 95th Rifles in the village…until two disastrous charge home results and a failed formation test.


The 95th Rifles can’t believe their luck, as the French columns become entangled and fail to charge home, while the rest of the lads arrive to reinforce them. The picket squadron of Hussars swing round to threaten the faltering French 2nd Battalion of the 8th Line. The French respond by bringing their 1st Dragoons up to threaten the Hussar squadron.
Turn 7: The French gain initiative and gets the 4th Brigade for reserves on their right, following on the heels of the 1st Brigade. The British don’t receive any. The French Dragoons get the charge on the Hussar squadron who boldly counter charge and get wiped out. The Dragoons get superb discipline and will be in charge range of the RHA next turn. One battalion of the 54th Line assault the village, and despite what befell the majority of the Brigade earlier, push home their charge. However, the 2nd KGL Hussars are just in reach of two French battalions and gallop forward. The 24th Line successfully form a regimental square but that doesn’t deter the KGL cavalry pressing home.


The French column of 54th Line not engaged move up to enflank the village on the left, while the remainder of the brigade reform. The British 2nd/3rd Foot Guard move into the village, while the1st Battalion are lining up in position with the 9pdrs to prevent the French 1st Brigade attacking the village on the British left. In melee, the 54th Line battalion valiantly push back the 95th Rifles in the fight for the village (though we weren’t sure we resolved it correctly, as we didn’t involve the British 2nd/3rd Guard who had just moved in but hadn’t occupied it). The cavalry charge of the 2nd KGL Hussars was soundly beaten by the 24th Line in square!
Turn 8 No reserves, and French initiative again. The 1st Dragoons charge the RHA who evade. The 8th Line Regiment in two columns assault the village (Not in mass column as the 45th Lin decide not to get in the way!) adding their numbers to the melee which has been further increased by the British in the 2nd/3rd Foot Guards. The French 24th Line reform to column as the are overtaken by the 9th Legere and the rest of the 1st Brigade pull alongside. The Voltiguers don’t fancy being to close to the British 9pdrs but have no orders to move away from the village. The British 4th Brigade rushes to try and reinforce the battle in the village.


In the battle for Pueblo Cajones, the French numerical superiority meant that although they were pushed back as the quality of the Guard and Rifles showed, the French casualties weren’t felt as acutely as the British. The 95th Rifles were nearing half strength, and the Guards battalion was greatly reduced, and the French had two columns to reinforce the battle next turn.
Turn 9 The British get initiative and get reserves in Barnard 3rd Brigade. The French get their last brigade, Grenadiers of the 3rd Brigade on the left flank. They are ordered to move and engage enemy forces behind the village. The French Dragoons successfully changed orders to assault the British behind the village and swung round to threaten the British 4th Brigade who had moved up ready to enter next turn. The Dragoons were letting the RHA battery enfilade them, but felt the risk worth it. The 2nd KGL, despite having lost 50% of their force swept round to charge the 9th Legere, who formed square. The 2nd KGL Hussars failed to press home, faltering in front of the formation…but the square was in effective 9pdr range. Three French columns assaulted the village again (not in mass column having learned how badly that failed), vastly outnumbering the defending British, pressing home into melee. The 9pdrs of the British targeted a column of the French 1st Brigade, trying to stall its advance on the town but did limited damage.


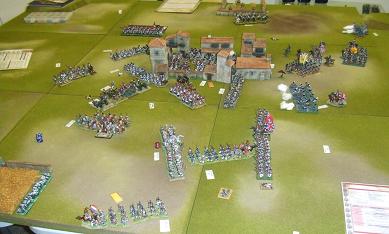
A view from the French centre as they close in on 3 sides of the beleaguered British forces…
The only melee saw yet another valiant display by those “stubborn fellows” of the 2nd/3rd Guards and 95th Rifles, preventing the French winning outright but allowing them a foothold in the village.
Turn 10 The French win initiative and the British finally get their final reserve on, as the 1st Brigade to arrive. The 1st Dragoons charge Brown’s Light Battalion at the village rear, who successfully reform to square. The 24th Line first battalion successfully assault the 1st Foot Guards in line, to occupy them


In melee, the 1st Dragoons are repulsed by the British 4th Brigade in square, the 24th Line 1st Battalion are totally outclassed and routed by the 1st Foot Guards, causing the 96th battalion to falter


But the French finally force out the valiant 95th Rifles and British Guards (down to 21% strength and 50% respectively but still not dispersing) and storm into the village


Turn 11 The British forces won initiative. The 1st Battalion Foot Guards charge the 24th Line 2nd Battalion who hold to give the faltering 96th battalion behind a chance to regroup. The British bring up their reserves towards the village, while the French consolidate their grip on it, preparing to engage with their superior numbers. The Foot Guards surprisingly only push back the 24th Line, leaving themselves exposed in the face of a 4 gun battery and superior French numbers

Turn 12 The British win initiative again but have no units available to charge. They decide to mount a defensive line just outside the village, with their fresh reserves supporting the retreat of the shattered remnants of the 95th and 2nd/3rd Foot Guards, which the French, with their superior numbers, troops safely ensconced in the village and grenadiers advancing down both village flanks, are happy to let them do, engaging with musketry.


We called it a day there after another great day of gaming. We deemed victory went to the French. The British had been forced out of the village and would have struggled to retake it although both forces still had a several undamaged units. However, the French had firm control of the village and had secured a tactical victory. We all agreed they won it due to better luck with reserve rolls, reserve timing and positioning (The 1st Dragoons in particular) and sheer weight of numbers. Had the British 1st Brigade been less shoddy in their march, their numbers would have been able to get in and around the village and make it far more of an even contest. That being said, it was an impressive performance by the 95th Rifles and 2nd/3rd Foot Guard repeatedly fending off French assaults on the village. These two British battalions (combining less than 50 figures when they were both in) held off five French battalions, containing three times the number of figures for five turns.


Great stuff Brian, I'll have to give General de Brigade al look some time as an occasional diversion from the Black Powder games.
ReplyDelete