We'd decided to do one of the least played (and thereby least viewed scenarios), A Storm of Swords.
Raymond and I had opted for a 40pt match, with Raymond taking some of the new Stormcrows with Boltons but waiting to finalise and tweak his force dependent on whether he was defending or attacking. I took a single Lannister list that felt could attack as well as defend, and were all movement 5...
As it tunrs out, I won the roll off and opted to defend, as Raymond wanted to attack anyway (well, thats the way I recall it!!!)
NCU's: The High Sparrow (C) & Cersei Lannister
Units: 3 x Lannister Halberdiers, 2 x House Clegane Mountains Men, 1 x Lannister Crossbows
Raymond took Daario Nahaaris to lead his forces, with a unit each of the new Stormcrows units, Archers and Mercenaries with a Leutenant, aided by 2 x Bolton Cuthroats and a unit of Flayed Men.
For NCU's, Lord Varys assisted by Walder Frey.

A STORM OF CROWS SCENARIO
First time either of us had played it, and the special rules were very interesting.
Defender gets 3 Wall sections which can activate and "fire" arrows, or, if engaged drop rocks and tar. They have 6 wounds but no save, and need two wounds to lose one... IF a wall is destroyed, 5 VPs are gifted to the attacker. The Defender loses if the Attacker gets 10 pts as usual, if not, the Defender wins.
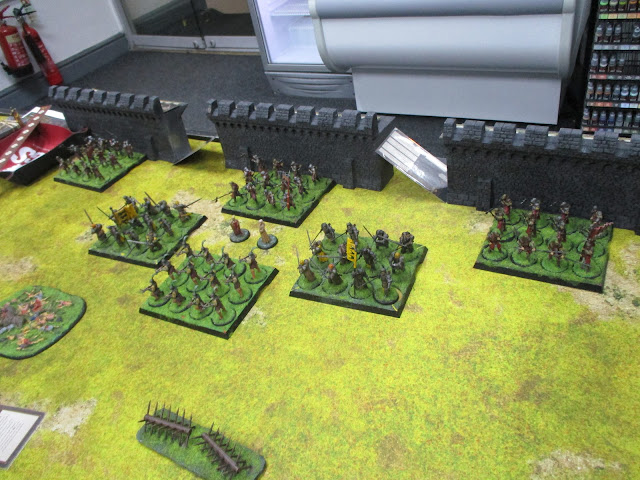
Also, only half units on, half off until turn 3 when they can effectively come on and outflank. And for terrain, all 4 pieces are set up by the defender, placing a palisade on my right with corpse pile central and two spiked barricades on left. I also got to use my Old Warhammer fortress again, which looked pretty good!!!
I set up the terrain to break up an attack, and set up Halberdiers guarding each section of wall.

For the attackers, well they set up 18" on and any unit destroyed can be re-deployed 18" on at the start of the next turn...

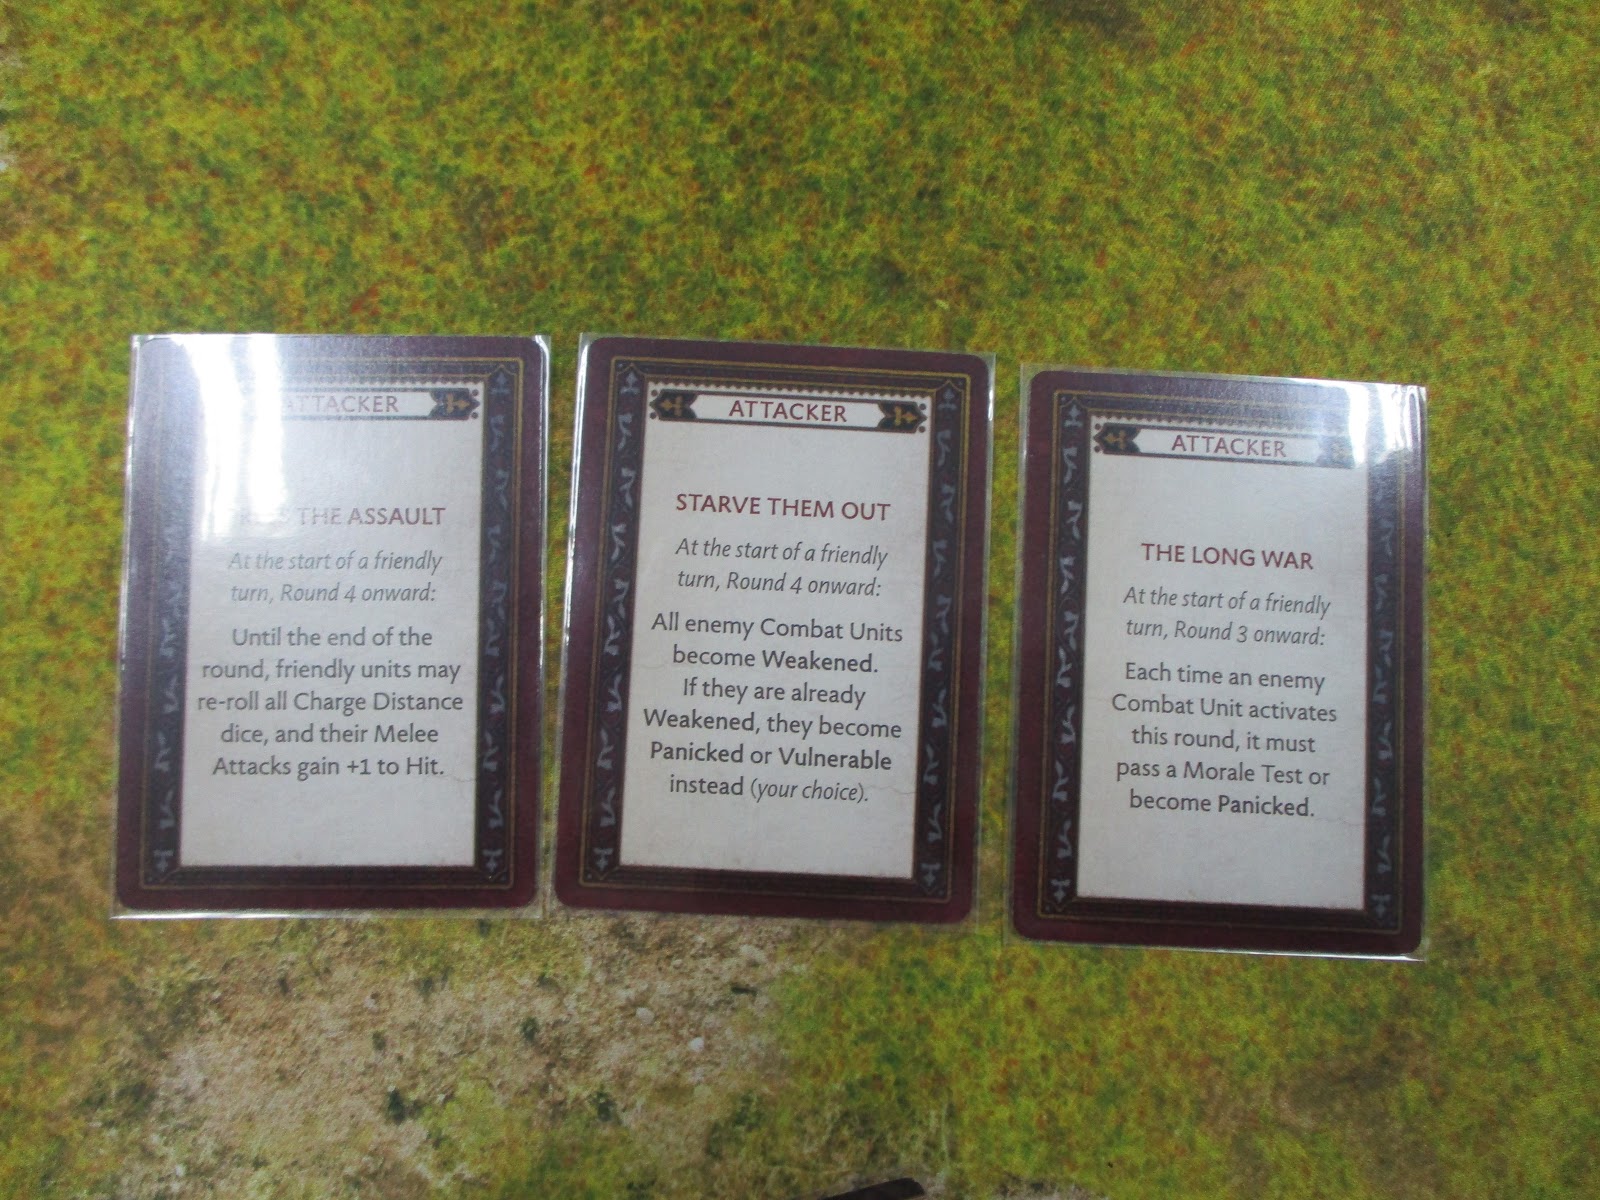
Additionally, both the attackers and defenders get 3 Siege cards. Mine were as below!!1

I got Raymond to take a picture of his, so I didn't know what to expect...
TURN 1
As usual, first turns were not overly exciting but as I had first activation I took the horses to deny the extra movement to the Mercenary forces. In return, Varys took extra cards on the Letter, Cersei failed to hurt the Flayed Men with Crown and Walder took the money and caused a wound...

The first 4 activations...

No one was in range of the walls, but the Flayed Men advanced rapidly and got into position to hit my left flank...

It does actually look bad for the Lannisters at the end of turn 1...

TURN 2
Well, we knew what was coming and I was kicking myself for advancing far enough to allow it (though I was trying to look at blocking avenues of attack. With critical blow and a card that allowed D3 extra hits (3), the vicious Flayed Men hit home in my flank with 12 hits...

Still, anyone who has ever suffered at the hands of my incredibly lucky dice will tell you how Raymond felt when I threw 7/12 five pus saves....


My first activation was to use the High Sparrow and send him out to "Parlay" rather than attack, stopping the Stormcrow Mercenaries from advancing and finishing of my Halberdiers...

Old Walder took the letters and gained more tactics cards, so Cersei opted for the moneybags to heal the depleted Halberdiers and allow them to attack considerably better...

As Raymond ponders more card shenanigans, I took a picture to remind myself of my incredible luck in still having a left flank....

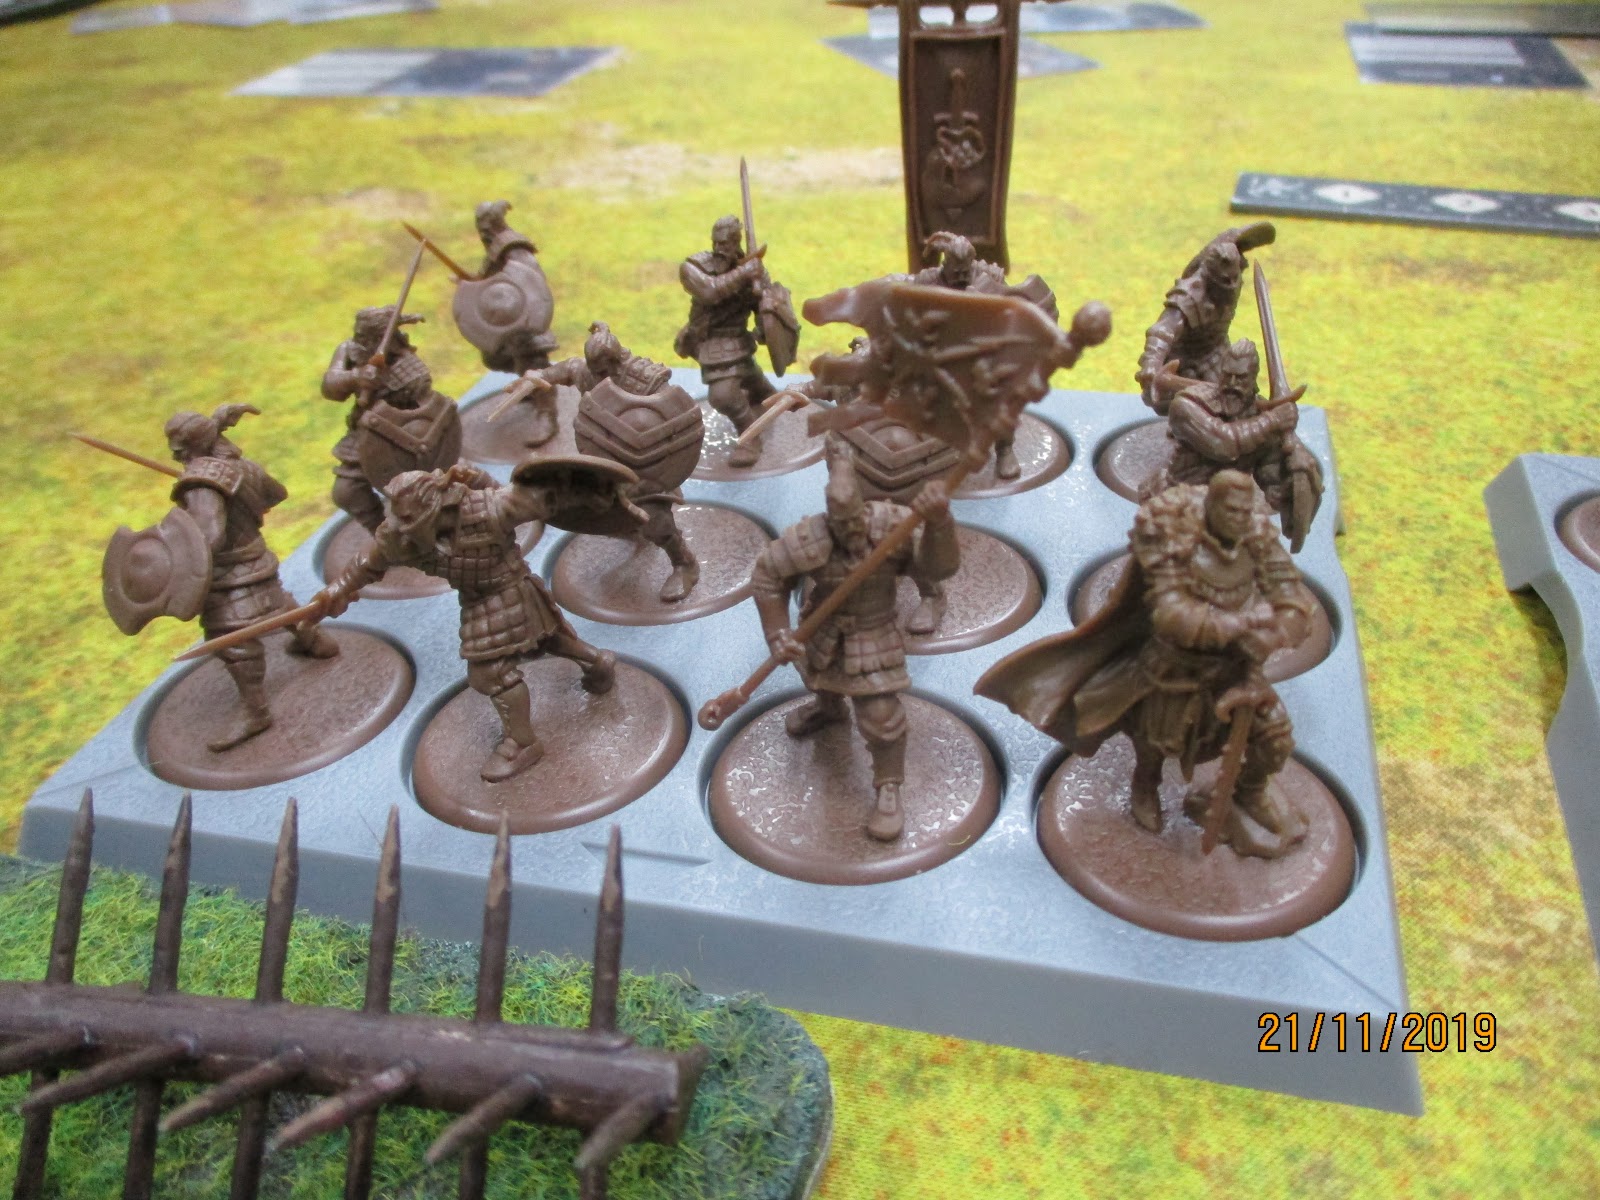
And a close up of the new Stormcrow Archers led by a Stormcrow Leftenant, which are really nice

but not compared to these beauties!!! With an additional sculpt in there for the rank and file (4 rather than 3 differing), these models are the best I've seen for the game. Fine detail and variety, they look awesome and I'll probably get a second unit for myself...
When Raymond had finished, I played Wrath of Warrior to give my Halberdiers a 2+ to hit (my mistake, it should have been a 3+ but would still have got 5 rather than 7 hits. Raymond saved all but 2 anyway, then lost another wound to panic...

I had hoped to do better, but still had the arrows from the walls...

Raymond switched his attention to the centre, with the Bolton Cutthroats disorderly charging in, losing 4 men to the set for charge order...

However, the 3 wounds inflicted was nothing compared to the Stormcrow archers and the combination of two panic tests which left my centre unit on 3 men.

My right Halberdiers faired much better, but Walder negated their Set for charge order. The walls dropped a few Stormcrow Mercenaries with arrows.

I was spoilt for choice for arrows from the walls...

I thinned out the Boltons a bit

And my Halberdiers on the right, with help from Cersei and the corpse pile really hurt the Boltons on my right...

TURN 3
With first activation, I played my arrow stock to fire all 3 walls. They managed to drop a Flayed Man and also take out the Boltons on my right, while my own panic tests from firing into melee were all spectacularly passed!!!

My first activation was to bring on a unit of Cleganes Mountains Men (sallying forth) and as placement doesn't count as activation, charged the flank of the Flayed Men with 9 hits...

The Flayed Men lost 3 wounds to attacks, and 3 more to panic, just enough to destroy them...

Raymond followed up with his first activation and revealed The Long War Attackers card, forcing all my units when activated to pass a morlae check or become panicked. I went on to fail one, I think...

I brought on my crossbowmen on my right, and sent a volley into the Stormcrow Archers flank, halving their numbers...

Old Walder reduced my right halberdiers to a single man but I added the High Sparrow to try and keep them alive a little longer...

The view from the battlements as the attacking Mercenaries are thinned out...

The Stormcrow Mercenaries managed to fend off Cersei's negative influence when she took the Crown, after they'd charged the Halberdiers

END of Turn 3.
With the arrival of my flanking reinforcements, the attackers were kept well away from my walls, though my starting units of Halberdiers were heavily depleted.

TURN 4

Old Walder activated to remove my left Mountains Mens abilities and whittle more Halberdiers down...

While playing Forced March to advance up the Cutthroats...

Its a nice card in this scenario...

And put my flank in real risk

Or rather it would have but I negated old Walder so left my Mountains Men with all their abilities...

I tried to clear out the middle with Cersei and failed while Varys stopped her influence and the Cutthroats charged into my Mountains Men who held quite firm...

I had the High Sparrow heal up my left Halberdiers, and influence them as they were locked in melee and needed the numbers...

As below, the unit was now well matched with the Mercenaries...

And my right flank was fairly safe for now...

The remaining Bolton Cutthroats rolled well and felled my central defenders...

But were felled by a flank charge by my last Halberdier from the right...

My left Halberdiers attacked the Stormcrows and allowed my centre unit to heal up with Fealty to the Crown...

I used this again when the Cutthroats were savaged by the Mountains Men...

The crossbowmen finished off the Stormcrow Archers and the walls remained intact with round 4 providing my forces with some reinforcements through a good hand and the right combination of cards and NCU's. Although the Flayed Men were back in play and up in my face!!!

TURN 5

However, I felt it prudent to activate my Mountains Men from the right to deny the Flayed Men a charge...

However, Raymond had some good dice and managed to fend off the worst of the attacks, taking the Swords to allow them to hit back...

With the benefit of Hold the Line, the Mountains Men wiped out the Bolton Cutthroats...

While the Stormcrow Mercenaries were also cut down by the Halberdiers, securing my left flank...

As Raymond moved up his new wave, my Crossbowmen reduced the ranks of the Flayed Men and the Halberdiers that had drifted from the right to the centre, charged the left flank of the Flayed Men, but didn't do anything...

The Crossbowmen had shifted back when they fired, so the Bolton Cutthroats marched up ready for next round...

End of Turn 5. Fair play to Raymond, he kept at it though reaching the walls was now realistically beyond him.

TURN 6
The Flayed Men got a free attackfrom the Swords, wiping out my Mountains Men, while I took Cersei and the Crown for first activation.

With Varys failing with his last token, Cersei influenced the Flayed Men, which coupled with Hear me Roar and the Corpse pile gave a massive negative. But they didn't break...

The Cutthroats charged the Crossbowmen, wiping them out in short order before advancing on the right wall.

It was the closest they'd gotten all game...

Having used the Arrows from the middle wall to finish off the Flayed Men, my few remaining Halberdiers tried to charge the Stormcrow Archers. But I failed and was reduced to a single man with the panic test.

Still, it felt good and looked good to cross the halfway line...

I also managed to score well with an arrow attack from the right hand wall thinning out the Cutthroats that had been so bold...

The Stormcrow Mercenaries finished off my Halberdiers and as the Mercenary wave advanced, my remaining two units fell back to their respective walls...

The game ended with the walls undamaged and the final wave of Mercenaries keeping their distance...

CONCLUSION
The game ended with Raymond's Mercenaries having scored 4 VP's from units killed. I can see why this scenario isn't allowed in Tournament play as its a tough nut to crack as the attacker. However, had the Flayed Men wiped out my left hand Halberdiers as they should have done at the start of turn 2, if may have been a lot closer.
Although the pictures fairly reflect the ebb and flow of the game, (including my 7/12 saves) I didn't take pictures of the three double sixes I rolled for panic tests, nor an eleven. The dice were heavily in my favour in this game and Raymond rarely matched them. Darrio Nahaaris's cards didn't get a run out until late in the game, so we didn't get a good look at him but the models as you have seen are awesome...
But again, thanks to Raymond for a great game, more so because he didn't give up when it was apparent he wasn't getting close to the walls. We will revisit this scenario again, with my forces as the attacker...
No comments:
Post a Comment